
[vc_row][vc_column width=”1/2″][vc_column_text]
The Short Version
For more detailed instructions please browse to tabs at the bottom of this page
- Use alcohol or lens cleaner to remove dirt or oils from the GPS
- Determine where to place Velcro® on your unit (see samples below)
- Cut and place Velcro® so as not to pass over card slots or other controls
- Remove Velcro® adhesive backing (avoid touching adhesive)
- Place Velcro® strips on GPS as far toward the front as possible – press firmly to secure
- Allow adhesive to cure 24 hours before attaching visor
[/vc_column_text][/vc_column][vc_column css_animation=”fadeIn” width=”1/3″ css=”.vc_custom_1494473854112{margin-top: 10px !important;margin-right: 10px !important;margin-bottom: 10px !important;margin-left: 10px !important;border-top-width: 2px !important;border-right-width: 2px !important;border-bottom-width: 2px !important;border-left-width: 2px !important;padding-top: 20px !important;padding-right: 20px !important;padding-bottom: 20px !important;padding-left: 20px !important;background-color: #f2f2f2 !important;border-left-color: #a8a8a8 !important;border-left-style: dashed !important;border-right-color: #a8a8a8 !important;border-right-style: dashed !important;border-top-color: #a8a8a8 !important;border-top-style: dashed !important;border-bottom-color: #a8a8a8 !important;border-bottom-style: dashed !important;border-radius: 3px !important;}”][vc_column_text]
NOTE
On/off push buttons can be activated by pressing on the shade over the switch.
If needed, make cuts in back edge of visor to allow for mount clips or to expose other switches etc. if needed. This will not harm the visor – it will not fray or unravel. However, just as a precaution, touch any loose threads with a little SuperGlue®.
Cutting the visor DOES NOT void our refund policy
Instructions are included with each visor
[/vc_column_text][/vc_column][/vc_row][vc_row][vc_column][vc_column_text]
Installation Variations
[/vc_column_text][vc_tta_tabs][vc_tta_section title=”Typical Motorcycle” tab_id=”1494472146325-eba61ba0-9a1a”][vc_row_inner][vc_column_inner width=”1/2″][vc_column_text]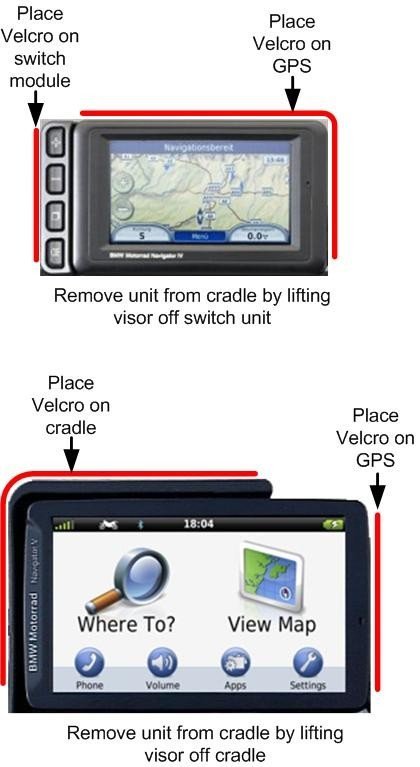 [/vc_column_text][/vc_column_inner][vc_column_inner width=”1/2″][vc_empty_space][vc_column_text]
If you need to avoid switches or ports, cut notches in back edge of visor.
IMPORTANT: Kitchen shears are great for this! Use just enough of the point of the shears to cut in through the Velcro portion of the back edge. You can also use a carpenter’s knife.[/vc_column_text][/vc_column_inner][/vc_row_inner][/vc_tta_section][vc_tta_section title=”In Dash” tab_id=”1494472146440-2335260e-6b29″][vc_row_inner][vc_column_inner width=”1/3″][vc_column_text]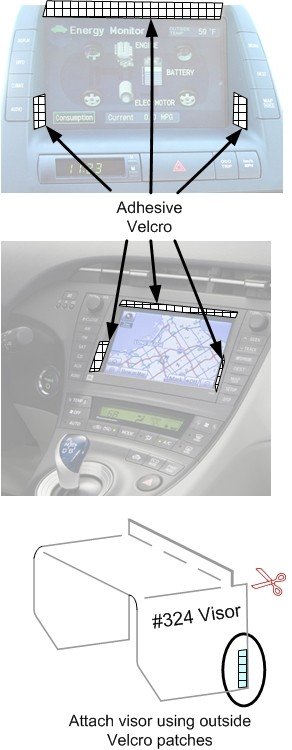 [/vc_column_text][/vc_column_inner][vc_column_inner width=”2/3″][vc_empty_space height=”52px”][vc_column_text]
Our visors are NOT made for this purpose. HOWEVER, THEY WILL WORK!
Just use the information below to see if YOUR SITUATION applies.
If it won’t work in the end, SEND IT BACK FOR A REFUND! No worries.
[/vc_column_text][vc_empty_space height=”16px”][vc_separator][vc_empty_space height=”16px”][vc_column_text]
- Use our Sizing Tool to see which visor you need.
- Place adhesive Velcro® patches as shown.
- Cut (if needed) and Fold the visor to the correct shape and attach it using the Velcro® patches sewn on to the visor.
IMPORTANT: Kitchen shears are great for this! Use just enough of the point of the shears to cut in through the Velcro portion of the back edge. You can also use a carpenter’s knife.
[/vc_column_text][/vc_column_inner][/vc_row_inner][/vc_tta_section][vc_tta_section title=”Flat Surface” tab_id=”1494472191691-bf8c84fc-3dd2″][vc_column_text]
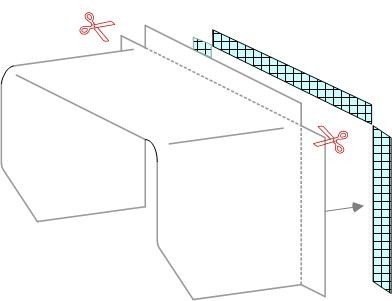 Nip the back edge of the visor in 2 places where the top section of the visor should transition to the sides. IMPORTANT: Kitchen shears are great for this! Use just enough of the point of the shears to cut in through the Velcro portion of the back edge. You can also use a carpenter’s knife.
- The distance between these cuts should equal the width of your display.
- Fold the back edges out 90 degrees as shown in the illustration.
- Place adhesive Velcro® on the flat surfaces and attach the Visor.
[/vc_column_text][vc_empty_space height=”65px”][/vc_tta_section][vc_tta_section title=”Chin Strap Method” tab_id=”1494472218497-c77f4ef6-a86e”][vc_column_text]
When you can’t put adhesive Velcro® on the sides of your unit, use this  method!
NOTE: We DO NOT supply the non-adhesive ‘fuzzy’ Velcro® needed for this method. It is commonly available at almost any hardware store, Wal-mart, or sewing supply.
- Place adhesive Velcro® (1) on the top of the unit ONLY, avoiding switches.
- Take advantage of the ‘hook’ patches (3) located on each end of the visor (2).
- Attach non-adhesive ‘loop’ (fuzzy) Velcro® (4) to one side of the visor (3).
- Run it under the bottom to the other side. Pull it taught and attach it to the other side (3).
This hold the sides in place (like a chin strap on a helmet)
[/vc_column_text][/vc_tta_section][/vc_tta_tabs][/vc_column][/vc_row]